1. tiny-cuda-nn 설치. (필수는 아니지만, 건너뛰려니까 쿠다관련 에러가 많이 떠서 겸사겸사 옵션들을 다 설치해보았다..)
    - gcc version, cmake version 을 올려야했다. 
   - 일단 cmake version 올리기. 밑의 블로그 참고했고, https://cmake.org/files/v3.21/ 여기서 tar.gz 파일 받아서 압축해제하고, 

./bootstrap --prefix=/usr/local
make
sudo make install

https://eehoeskrap.tistory.com/397


[CMake] Ubuntu에 CMake 설치하기

1. apt 를 이용한 설치 (구버전이 설치됨) $ sudo apt install cmake 2. 직접 최신버전 설치 2.1 홈페이지에서 다운로드 https://cmake.org/download Download | CMake Current development distribution Each night binaries are created as

eehoeskrap.tistory.com

진행하면 된다. 중간에 openssl이 설치되어있지 않다는 오류가 떠서, openssl 설치하고 다시 bootstrap 했더니 순조롭게 진행중.

sudo apt-get install libssl-dev

-- gcc 도 업그레이드 했다. 밑의 사이트를 참고하면, 여러 버전의 gcc를 설치해놓고 우선순위를 정해놓으면 같이 쓸수 있나보다!

https://nautiluslee.blogspot.com/2019/11/ubuntu-1804-gcc.html

근데 cuda version이 11.7 이상이어야 가능한 것이었다.. 70이상이라길래 뭔말인가.. 무시했더니 11.7 이상이란 뜻이었음.. ㅎ 

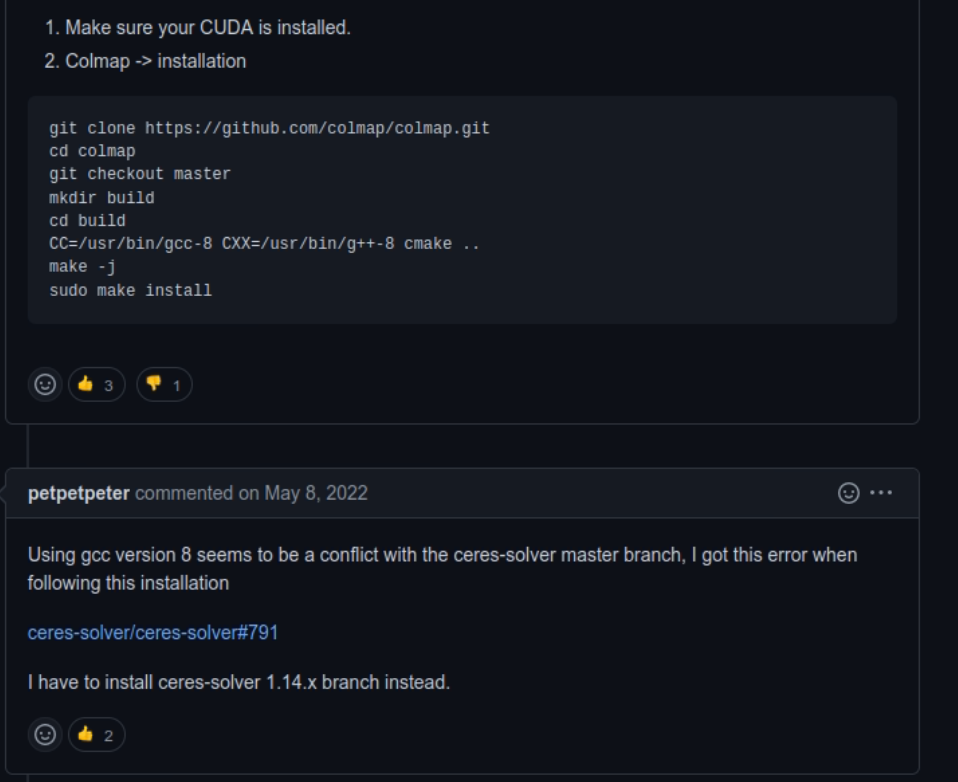
그런데 nvcc -V 랑 nvidia-smi 버전에 다 11.7 이어도 에러가 났다. 그건 nvidia-cuda-toolkit 을 apt-get 으로도 깔면 run 파일로 설치한 것이랑 공존하게 되는데, apt-get 이 예전버전으로 설치가 되므로 (10.1?) 그것을 nvcc 가 감지해서 그걸 우선순위로 사용하기 때문이었다. 아무튼 그래서 밑의 issue 에서 언급하듯 그걸 삭제한 후, bashrc 에 있는 LD_LIBRARY_PATH, PATH를 제대로 설정했는지 체크하고, build 폴더를 삭제하고 다시 build 하면 멀쩡하게 작동한다.

https://github.com/NVlabs/instant-ngp/issues/747

https://github.com/NVlabs/instant-ngp/issues/1044

그렇게 설치를 마치고서, pytorch 버전의 tcnn을 설치한다.

pip install git+https://github.com/NVlabs/tiny-cuda-nn/#subdirectory=bindings/torch

2. 다시 torch-ngp 로 돌아와서, 그다음 extension 들을 설치한다.

https://github.com/ashawkey/torch-ngp


먼저, 쿠다 11.6 또는 11.7 등이 깔려있어야한다. 

그 이유는, 까먹었다. 그런데 colmap 설치할 때 ceres-solver를 설치해야하는데, 그 버전을 맞추려면 그래야 됐던것 같다.

colmap 설치할 때 일단 official document의 install 을 따르면 안된다.. issue 에서 찾아서 사람들이 공유하는걸 보고 적당히 맞춰야 함..

나중에 설치를 다시 완료하면 보충하러 오겠음..

'Experiments' 카테고리의 다른 글

instant-nerf 설치하기  (0) 2023.02.19
git commit 할때 파일 빼기  (0) 2022.03.01
mujoco 150 설치하기. Ubuntu 18.04에서.  (0) 2022.01.19
고통의 3D spacemouse UR5와 연결하기.  (0) 2022.01.04
Latex 자주 쓰는 모음 정리  (2) 2021.12.18

기존에 실수로든 git에 올린 파일들은 후에 .gitignore에 추가하더라도 계속 change가 commit 때 반영되는 경우가 생긴다.  

그 행동을 영구적으로 억제하려면 그 파일을 삭제 후 commit해서 원격 저장소에서부터 없애야 하겠지만, 현재 실험이 돌아가고 있어서 내부부터 뜯어고치는 것이 어려운 경우 추천하는 방법.

git checkout -- <file>

사실 git status 하면 바로 추천으로 뜨는 명령어이긴한데, 그동안 무시했다가 git한테 호되게 혼난 후 설명을 꼼꼼히 읽어보게 되었다! 

1. zip파일 다운로드

https://roboti.us/download.html


Download

This page contains legacy MuJoCo releases from Roboti LLC (versions 2.0 and earlier) followed by the list of changes. These versions require an activation key. A free license with unlocked activation key is available at the License page. New releases from

roboti.us

2. mjkey.txt 다운로드

https://roboti.us/license.html


License

Free license DeepMind has granted Roboti LLC license to provide an unlocked activation key for legacy versions of MuJoCo (2.0 and earlier). This key is available to everyone on the terms of the free license below. It expires on October 18, 2031. Activation

roboti.us

3. /home/user 에서 .mujoco 폴더를 만들고, mjkey.txt랑 mjpro150 폴더를 넣는다.

/home/user/.mujoco/mjkey.txt 랑 /home/user/.mujoco/mjpro150 이 되도록!

4. /home/user/.bashrc 파일에 export LD_LIBRARY=/home/user/.mujoco/mjpro150/bin 을 쓰고 저장해서 나온 후
source ~/.bashrc 라고 친다.

5. 위 두개 줄까지는 거의 필수로 필요하고, swig는 설치 안된경우를 처음보긴 했다. 이 외에도 에러가 발생한다면,, 구글 신이 도와주실 듯..

sudo apt-get install libosmesa6-dev
sudo apt install -y patchelf
sudo apt-get install swig

6. 이제와서 왜 mjpro150을 설치하는가? openai gym이 뜬금없이 mujoco support를 150으로 내렸기 때문.. 에러가 있다나 뭐라나.. 

'Experiments' 카테고리의 다른 글

nerf-supervision github 설치하기  (0) 2022.12.28
git commit 할때 파일 빼기  (0) 2022.03.01
고통의 3D spacemouse UR5와 연결하기.  (0) 2022.01.04
Latex 자주 쓰는 모음 정리  (2) 2021.12.18
learning rate 결정하기  (0) 2021.08.11

<진행중>

1. 3D space mouse 드라이버를 깐다. (맥은 잘 깔리는데, 리눅스는 안 깔린다.) https://3dconnexion.com/kr/drivers/ 맥은 Big Sur 버전이 따로 있으니 자신의 맥을 확인하자. 리눅스는 드라이버가 제대로 작동 안하니까, spacenav (http://spacenav.sourceforge.net/)라는 다른 드라이버를 깐다.

여기서 spacenav에 3가지 종류가 있는데, 일단 spacenavd 가 기본이다. - 사실 제대로 설치가 된건지 아닌건지 확인할 길이 없다.. 하지만 일단 진행하자.

2. UR5와 3D spacemouse를 연결하는 것에는 여러가지가 있는데, RLkit (robosuite) https://github.com/rail-berkeley/rlkit/tree/master/rlkit/demos/spacemouse 에도 있고, MoveIt! https://ros-planning.github.io/moveit_tutorials/doc/realtime_servo/realtime_servo_tutorial.html 에도 있다. 


3. 먼저 RL kit부터 설명하자면, 현재 mac에서만 구동 가능하다고 쓰여있긴 하다. 근데 linux에서 왜 안되는지는 알 수 없다. 이게 RL kit, robosuite에 구현되어 있는 코드가 hidapi (https://github.com/libusb/hidapi)를 쓰는데, hidapi를 파이썬에서 쓸 때 제대로 돌아가는 것은 Mac (pip install hidapi) 에서 밖에 없는듯 하다. Linux에서는 sudo apt install을 하라고 되어있는데, 뭔가 파이썬이랑 연결하는 부분을 일단 못찾겠고,, hidapi를 linux에서 깔아도 제대로 인식이 안되는 것 같달까.. (맥에서는 3D mouse, 3D mouse device, 3D keyboard 이렇게 세 부분으로 나뉘어서 인식되고, device나 keyboard를 인식시키면 되는것 같은데, 리눅스에서는 3D mouse만 인식되고 그마저도 연결은 안된다 - 이부분은 맥과 동일.)  윈도우 에서도 시도해보려했는데, 윈도우 비밀번호를 까먹음.. 하하


맥이 zsh가 기본이어서 bash로 바꾸는게 속편하고, M1 mac이어서, mujoco는 2.1.1부터 가능한 것 같다. - 근데 gcc 버전 관련해서,, 약간 오류가 있는데, 아무튼 메인 git에서 제안하는 대로 LLVM을 깔아서 세팅을 해주면 어느정도 설치는 되는데(https://github.com/openai/mujoco-py/issues/662 )

import 할 때 build가 안된다. 뭔가 library confidence 오류 같은데. 근데 rlkit가 제대로 maintain이 안되는지 코드가 python 3.5 기반이고, multiworld 라는걸 추가로 깔아야하는데 그것도 conda environment로 깔아야하는데 mujoco 2.1.1을 써야하는 상태에선 dependency를 맞출 수가.. 엄두가 안난다. -- 그래서 rlkit보단 maintain 잘되는 robosuite로 가는게 속편한데, 흠.. to be continued..?!


4. MoveIt!을 깔기 위해서는 먼저 ROS를 깔아야한다. (Ubuntu 18.04이므로 Ros melodic을 깔았다!) 
그다음 catkin을 설치한다. 그후 MoveIt을 설치하는데, ** 꼭 source에서 설치해야 spacemouse 관련 코드가 설치된다. https://moveit.ros.org/install/source/** 그다음 catkin workspace에서 앞으로의 작업이 진행되는데, 
catkin workspace에 moveit tutorial 등을 다운받고 build를 진행한다. 


그 후부터는 계속 다운받고, build하고, 실행하는 것의 연속인데, roslaunch를 할 때는 한 터미널에서 계속 작업이 돌아가므로 tmux를 이용해서 터미널을 나누는 것이 보기 편하다.  


Gazebo 시뮬레이터를 돌릴 때는 꼭 RViz가 같이 돌아가야하는 것 같은데.. 아무튼 얘네를 켰다가 끌 때 꼭 잘 꺼야 나중에 다시 킬 때 에러가 나는 것을 방지할 수 있다. 아 그리고 joystick control teleoperation 탭에서의 추가사항을 세팅해줘야 돌아가는 것 같다. https://ros-planning.github.io/moveit_tutorials/doc/joystick_control_teleoperation/joystick_control_teleoperation_tutorial.html#getting-started


Joystick Control Teleoperation — moveit_tutorials Noetic documentation

Version: Moveit 2 - Foxy MoveIt 1 - Noetic MoveIt 1 - Melodic

ros-planning.github.io

이렇게 하면 시뮬레이터 내에서는 3D spacemouse를 사용할 수 있는데, 실제 UR5 로봇에서 돌리기 위해서는 ROS controller를 또 추가설치 해줘야한다. (이마짚..) https://github.com/UniversalRobots/Universal_Robots_ROS_Driver 


GitHub - UniversalRobots/Universal_Robots_ROS_Driver: Universal Robots ROS driver supporting CB3 and e-Series

Universal Robots ROS driver supporting CB3 and e-Series - GitHub - UniversalRobots/Universal_Robots_ROS_Driver: Universal Robots ROS driver supporting CB3 and e-Series

github.com

5. 먼저 robot preparation 파트에서 externalcontrol-1.0.5.urcap을 다운받아서 로봇에 설치해줘야한다. <진행중>


6. 사실 속편하게 돈으로 해결하는게 빠르다. "sales@radalytica.com" 로 메일을 보내서 돈을 줄테니 가르쳐달라고 하자. 

https://www.radalytica.com/ 여기서 UR5랑 마우스를 연결해놓은걸 확인할 수 있다. 

'Experiments' 카테고리의 다른 글

git commit 할때 파일 빼기  (0) 2022.03.01
mujoco 150 설치하기. Ubuntu 18.04에서.  (0) 2022.01.19
Latex 자주 쓰는 모음 정리  (2) 2021.12.18
learning rate 결정하기  (0) 2021.08.11
data loader 속도 높이기  (0) 2021.08.09

1. 위첨자 ^ , 아래첨자 _

http://www.dfcd.net/articles/latex/latex.html 참조!

2. Figure 넣기

\begin{figure}
\includegraphics[width=1.0\linewidth]{figs/framework_o_rev.png}
  \caption{Walawala}
  \label{fig:comp-algo}
\end{figure}


3. Algorithm 넣기

\begin{algorithm*}
\setstretch{1.2}
\caption{Heyyy}\label{alg:detect}
\begin{algorithmic}
\Require $ I^k, [o_{x1}, o_{y1}, o_{x2}, o_{y2}]_N^k, [o]_N^k $
\Ensure $I^k $ \Comment{Get image}

\State $ I^k = ROI( RPN(I^k))$
\State $ \hat{I}^k, \hat{A}^k, = VMM_{Boxhead}(I^k)$
\State \textbf{Function}\{$VMC_{Boxpred}$\}
     \State \quad \quad$ [\hat{a}]_M^k  = HandAction(\hat{A}^k)$
    
\State \textbf{EndFunction}
 \State  $y = Concat(y, x) $
 \State $ [\hat{o}]_N^k = Concat([\hat{o}]_M^k, [\hat{a}]_M^k)$

\end{algorithmic}
\end{algorithm*}

가장 밖 algorithm에 붙는 *를 빼면 2 column paper일 때 한 쪽 column에만 들어감.


4. Equation 넣기

\begin{gather}

\{I_t\}^{T}_{t=1} = [\{I_t^1\}^{1e}_{1s},  \{I_t^K\}^{Ke}_{Ks}] \\
\{a_t\}^{T}_{t=1} = [a^1,  ..., a^k, ..., a^K] \\
\{o_t\}^{T}_{t=1} = [o^1,  ..., o^k, ..., o^K] 

\end{gather}

여러 줄 넣을 때가 gather, 한줄만 넣을 때는 equation.

\begin{equation} \label{eq:vmm}
\{\hat{I}^k\}_{m}, \hat{A}^k, \hat{a}^k = VMM(\{I^k\}_{m})
\end{equation}


'Experiments' 카테고리의 다른 글

mujoco 150 설치하기. Ubuntu 18.04에서.  (0) 2022.01.19
고통의 3D spacemouse UR5와 연결하기.  (0) 2022.01.04
learning rate 결정하기  (0) 2021.08.11
data loader 속도 높이기  (0) 2021.08.09
image encoder batch normalization  (0) 2021.08.01

https://stackoverflow.com/questions/9619199/best-way-to-preserve-numpy-arrays-on-disk


best way to preserve numpy arrays on disk

I am looking for a fast way to preserve large numpy arrays. I want to save them to the disk in a binary format, then read them back into memory relatively fastly. cPickle is not fast enough,

stackoverflow.com

https://discuss.pytorch.org/t/how-to-speed-up-the-data-loader/13740


How to speed up the data loader

Hi I want to know how to speed up the dataloader. I am using torch.utils.data.DataLoader(8 workers) to train resnet18 on my own dataset. My environment is Ubuntu 16.04, 3 * Titan Xp, SSD 1T. Epoch: [1079][0/232] Time 5.149 (5.149) Data 5.056 (5.056) Loss 0

discuss.pytorch.org


npy/npz 나 hdf5로 저장하는 것이 제일 numpy 저장할 때 좋다. 

NVIDIA DALI 는 data augmentation에 유용하다는데 augmentation을 안할 때에도 유용한지, image data랑 다른 종류 데이터가 섞여있어도 속도가 빠른 건지를 확인해봐야 할듯.

각 저장 형식마다 속도 및 용량 비교한 것은 아래 github에서 확인 가능!

https://github.com/epignatelli/array_storage_benchmark

'Experiments' 카테고리의 다른 글

Latex 자주 쓰는 모음 정리  (2) 2021.12.18
learning rate 결정하기  (0) 2021.08.11
image encoder batch normalization  (0) 2021.08.01
python pickle errors (stable-baselines3 trained agent)  (0) 2021.07.11
ResNet & iResNet  (0) 2021.02.11

https://discuss.pytorch.org/t/why-different-validation-and-train-loss-for-the-same-data/60487/3


Why different validation and train loss for the same data

Hi @ptrblck I am not using any dropout layers. The architecture I am using can be seen below: ResNet3D( (strConv1): Conv3d(64, 64, kernel_size=(3, 3, 3), stride=(2, 2, 2), padding=(1, 1, 1)) (strConv2): Conv3d(128, 128, kernel_size=(3, 3, 3), stride=(2, 2,

discuss.pytorch.org

test loss가 train loss에 비해 월등히 높은 현상이 일어남. (둘의 dataset이 같은데도.) - batchnormalization eval 했더니 해결되었다.


batch size가 작아서라는 의견도,

data가 non-stationary 해서 그렇다는 의견도( momentum을 줄이면 된다고 하는데) 있고,

batch norm이 eval에서는 batch statistics를 train 때의 평균을 가지고 하는데 뭐 그게 잘 안맞을 때 이런 현상이 있다는 얘기도 있다. (track_running_stats=False)

https://discuss.pytorch.org/t/model-eval-gives-incorrect-loss-for-model-with-batchnorm-layers/7561/38


Model.eval() gives incorrect loss for model with batchnorm layers

Its pretty huge. with net.train(): 7e-8 with net.eval(): 99.3 Here is the truncated output (btw i fixed a bug in the original repro code, where the input batchsize did not match the output batchsize, now batchone = torch.ones[2, 1, 64, 64]… instead of [4

discuss.pytorch.org

https://github.com/pytorch/pytorch/issues/4741


Using model.eval() with batchnorm gives high error · Issue #4741 · pytorch/pytorch

I tested my network using model.eval() on one testing element and the result was very high. I tried to do testing using the same minibatch size as the training and also testing on one batch size wi...

github.com


'Experiments' 카테고리의 다른 글

learning rate 결정하기  (0) 2021.08.11
data loader 속도 높이기  (0) 2021.08.09
python pickle errors (stable-baselines3 trained agent)  (0) 2021.07.11
ResNet & iResNet  (0) 2021.02.11
Imitating Latent Policy from Observation 2  (0) 2020.12.26

https://stackoverflow.com/questions/63329657/python-3-7-error-unsupported-pickle-protocol-5


Python 3.7 Error: Unsupported Pickle Protocol 5

I'm trying to restore a pickled config file from RLLib (json didn't work as shown in this post), and getting the following error: config = pickle.load(open(f"{path}/params.pkl", "rb&...

stackoverflow.com

pip install --upgrade --quiet cloudpickle pickle5 라고만 치면 3.7 환경에서도 cloudpickle 5를 쓸 수 있다.

'Experiments' 카테고리의 다른 글

data loader 속도 높이기  (0) 2021.08.09
image encoder batch normalization  (0) 2021.08.01
ResNet & iResNet  (0) 2021.02.11
Imitating Latent Policy from Observation 2  (0) 2020.12.26
Imitating Latent Policy from Observation  (0) 2020.12.11

ResNet은 CNN이 점점 깊어질 수록 vanishing gradient 의 문제로 인해 오히려 에러가 높아지는 현상을 해결하기 위해 만든 구조로, 밑의 사이트에 설명이 잘 나와있다.

bskyvision.com/644


[CNN 알고리즘들] ResNet의 구조

LeNet-5 => https://bskyvision.com/418 AlexNet => https://bskyvision.com/421 VGG-F, VGG-M, VGG-S => https://bskyvision.com/420 VGG-16, VGG-19 => https://bskyvision.com/504 GoogLeNet(inception v1) =>..

bskyvision.com

invertible ResNet은 classification에만 주로 쓰이는 resnet을 generation에서도 쓸수있게 만들자는 건데, Euler's method for ODE initial value problem과 ResNet architecture가 공통점을 가지는 것에서 착안하였다.


Lipschitz-constant : 함수의 기울기 최대값이라고 볼 수 있다. 다만 무한히 기울기가 증가하는 함수는 lipschitz continuous 하지 않고, 따라서 lipschitz-constant를 갖지 않는다. 자세한 설명은 밑의 블로그에서.

sanghyeonna.blogspot.com/2018/08/spectral-normalization-part2_30.html


Spectral Normalization - part.2

이 정리는 Spectral Normalization  논문에 관한 정리입니다. 이번 포스팅에서는 Lipschitz constant의 정의와 의미 그리고 Spectral Normalization이 무엇이고 이것이 어떻게 Lipschitz constant...

sanghyeonna.blogspot.com

spectral norm: 왜 난 이게 Lipschitz norm이랑 같아 보이냐.. L2이고 linear transformation 일때의 lipschitz norm이랑 다를게 없어보임..!

Banach fixed-point theorem: 

F(x) = x가 되는 점이 하나 이상 존재한다!

Jacobian : 나올때마다 생소한데, 알고보면 친숙한 행렬.

f의 각 요소를 x의 각 요소로 미분한 행렬

SVD (singular value decomposition) : 

angeloyeo.github.io/2019/08/01/SVD.html

1. stable-baselines 에서 VecVideoRecorder를 가지고 gym 환경 녹화하기 (mujoco는 안됨. atari랑 classic control만 되더라 - mujoco는 rendering 환경에서 video record하는 거만 되는듯..)

colab.research.google.com/github/araffin/rl-tutorial-jnrr19/blob/master/1_getting_started.ipynb#scrollTo=4efFdrQ7MBvl


Google Colaboratory


colab.research.google.com

이거는 jupyter나 colab에서 돌릴 때 유용할듯.

이 함수는 gym.wrappers.monitoring의 video_recorder.py를 가지고 만든 함수이다.

또한 GIF를 만든다든지,  official 한 도움은, 밑에서 받을 수 있다.

stable-baselines.readthedocs.io/en/master/guide/examples.html


Examples — Stable Baselines 2.10.2a1 documentation

PyBullet: Normalizing input features Normalizing input features may be essential to successful training of an RL agent (by default, images are scaled but not other types of input), for instance when training on PyBullet environments. For that, a wrapper ex

stable-baselines.readthedocs.io

이때 pybox2d를 다시 설치해야할 수도 있고, (swig를 설치하거나) - lunarlander example을 돌릴때


2. random 함수는 

import random

random.seed(2)  -> 아무 수나 가능.

random.random() 해서 0과 1사이 수를 얻을 수 있다.


3. 16.04에서 이 실험을 재현하다보면 - 설치하다보면, mujoco-py 2.0 이상 버전 설치할 때 patchelf를 설치하라는 얘기를 들을 수 있다. - 근데 개귀찮음. <processing>


4. video가 잘 만들어지는지 보기위해 VLC player도 설치하고 ubuntu-restricted-extras도 설치해봄. 근데 gym.videorecorder로 만든거는 재생이 안되더라. gif는 잘 보임.

askubuntu.com/questions/214421/how-to-install-the-mpeg-4-aac-decoder-and-the-h-264-decoder


5. custom gym env 만들기 -매우 잘 설명해주신다. 

www.youtube.com/watch?v=kd4RrN-FTWY&t=366s

6. error


models/ilpo.py 162 tf.compat.v1.set_random_seed


models/image_ilpo.py 41 string_input_producer (tensorflow.python.training.input)->

Queue-based input pipelines have been replaced by `tf.data`. Use `tf.data.Dataset.from_tensor_slices(string_tensor).shuffle(tf.shape(input_tensor, out_type=tf.int64)[0]).repeat(num_epochs)`. If `shuffle=False`, omit the `.shuffle(...)`.


models/image_ilpo.py:42: WholeFileReader.__init__ (from tensorflow.python.ops.io_ops) is deprecated and will be removed in a future version. ->

Queue-based input pipelines have been replaced by `tf.data`. Use `tf.data.Dataset.map(tf.read_file)`.


models/image_ilpo.py:47: The name tf.assert_equal is deprecated. Please use tf.compat.v1.assert_equal instead.


7. from_tensor_slices 함수

www.tensorflow.org/api_docs/python/tf/data/Dataset


tf.data.Dataset  |  TensorFlow Core v2.4.0

Represents a potentially large set of elements.

www.tensorflow.org

www.tensorflow.org/api_docs/python/tf/data/Iterator

+ Recent posts